Did you know we are also on Houzz? Go check out our photos and add them to your own idea books. It is the perfect place to ask questions and get feedback from the community!
Once you're there you'll find we have Bathrooms, Kitchens, Additions and Full Home Remodels.
Go take a look!

Monday, November 5, 2012
Monday, October 15, 2012
M. Master and Hall Bathrooms
Looking for more Bathroom ideas? You're in luck, here is another Hall and Master Bath!
This young family just moved into their new home and have decided, like many other new home buyers, it needs to be updated! They lucked out by buying it after the kitchen had already been updated, so they focused their attention on the bathrooms.
The Hall Bathroom is shared by their children and the occasional guest. This meant a lot of foot traffic and usage, so they kept that in mind while choosing materials.
An important thing to remember when you are choosing materials is continuity. You don't need to chose the same materials for each bathroom, but you should keep in mind a particular style. What we mean is, it is odd to make one bathroom ultra modern and the other cottage style. You can see this idea of continuity in both bathrooms.


Along the same lines--if you have ever had to share a bathroom with someone who gets up at the same time as you, you become very grateful for a double sink. Here is the master bathroom, where they got a new double vanity, new mirrors and new lighting and some additional custom cabinetry for linens and things.

They wanted a large shower in the Master Bathroom. They definitely got one! just look at how luxurious this shower is.


This young family just moved into their new home and have decided, like many other new home buyers, it needs to be updated! They lucked out by buying it after the kitchen had already been updated, so they focused their attention on the bathrooms.
The Hall Bathroom is shared by their children and the occasional guest. This meant a lot of foot traffic and usage, so they kept that in mind while choosing materials.
An important thing to remember when you are choosing materials is continuity. You don't need to chose the same materials for each bathroom, but you should keep in mind a particular style. What we mean is, it is odd to make one bathroom ultra modern and the other cottage style. You can see this idea of continuity in both bathrooms.
The finished Hall Bathroom's tub and shower share all the same tile and glass. The tub surround extends just a little further into the shower to create a shower seat!


In addition to a new tub and shower, the hall bathroom got a new double vanity, new mirrors and new lighting. If you have ever had guest staying with you, you know how useful having a double sink can be!


They wanted a large shower in the Master Bathroom. They definitely got one! just look at how luxurious this shower is.


Want to see more? You can see all the pictures on our website or check them out and let us know what you think on facebook
Monday, October 8, 2012
South Bay Home & Garden Show
We have a new event coming up to look forward to. If you have any family, friends, coworkers or neighbors that you know have a home project coming up, tell them to come see us!

We look forward to seeing you there!

We look forward to seeing you there!
Monday, August 27, 2012
B.H. Kitchen Remodel
The B.H. Project included not only a new Kitchen, but also remodeling their Laundry Room and even adding a new Powder Room!
The first major change was opening up this wall between the Kitchen and the Dining Room. The "before" photo shows a 2'-8" swinging door opening into the Kitchen. Just look at how much bigger it makes the space seem after we increased the wall opening.


Before After
Before, they had to move the dining room table closer to the wall so they wouldn't be blocking the swinging door into the kitchen. This was a little inconvenient since the chairs were so close to the window. Now, they are able to center the dining table in the Dining Room, which creates an amazing visual for the space.


Before After
We changed the location of the sink as well. Before, it was a corner sink with a corner window. Overall, corner sinks can take up a lot of unnecessary space that could have been used under the counter or even on upper cabinet storage. The new sink is a stunning copper farm style sink which can be seen from the living room. Line of sight is very important when considering a remodel, and we think this worked out very well.


Before After
Now for the new Laundry Room! The laundry room was a pretty good size, so they wanted to see if there was enough space for a powder room. Sure enough, we fit a Powder Room in there, with the stipulation of stacking the washer and dryer. They also replaced the small closet with a custom cabinet/pantry.


Before After
Here is a look at the size of the Powder Room. It is a pretty standard size, finished off with a custom pedestal sink to fit the space.


Monday, July 16, 2012
B.D. TILE
If you are looking to remodel your bathrooms and you love tile, pay attention! We did some major tile work on these 3 bathrooms!

The Master Bathroom:
Square Footage of this room did not change, but we did add separation walls to put in the tub and shower. The biggest change to this room was tile! They got new tile flooring, tub enclosure, vanity backsplash and wall all the way to the ceiling, shower walls and floor. They also got new custom cabinetry and plumbing fixtures.


Here is a better look at the new custom cabinetry in the Master Bathroom. They chose wall faucets for the sinks. The faucets and tile must be measured out in detail in order to ensure that the faucets come out centered over the sinks. If this is something you are considering, you can see that it is worth it --the end result is stunning.


In Bathroom #1 the larger wall tiles lay vertically with a band of mosaic separating the brown tiles from the smaller tan tiles above. Here in Bathroom #2 the larger tiles lay horizontally with no hard separation between the purple tiles and the small glass tiles above.


Bathroom #1 Bathroom #2


Bathroom #1 Bathroom #2
The custom cabinetry is essentially the same in both vanities, but the finishing materials are different. Bathroom #1 has a clear glass vessel sink where Bathroom #2 has the same rectangular sink used in the Master Bathroom.


Last, but not least, we gave them a laundry room with lots of counter space and a prep sink.

Want to see more? You can see all of the pictures on our website or check them out and let us know what you think on Facebook.
Wednesday, June 13, 2012
Living Social Deal
We have a really great deal going on right now on LivingSocial.com's Daily Best Deals!
You could get a 5-Hour Design Package for $199!
- If your pad is stuck in the past, fast-forward with a five-hour design package that brings it up to date.
- Includes a current floor plan of remodel area, new floor plan of remodel area, and black and white elevation shots of new counters, cabinetry, and other features.
- Full-service business offers both architectural design services and construction expertise.
- Enjoy a stress-free remodeling experience with experts who tackle each project with personalized attention.
Tuesday, June 12, 2012
Mellowood Home Remodel

Newly Remodeled Home
Even the exterior of this home, including landscaping, got remodeled. We replaced the siding with stucco, added a stacked rock facade, replaced the exterior lights, added a new garage door and topped it all off with new shutters to add detail on the windows.


Before After


Before After
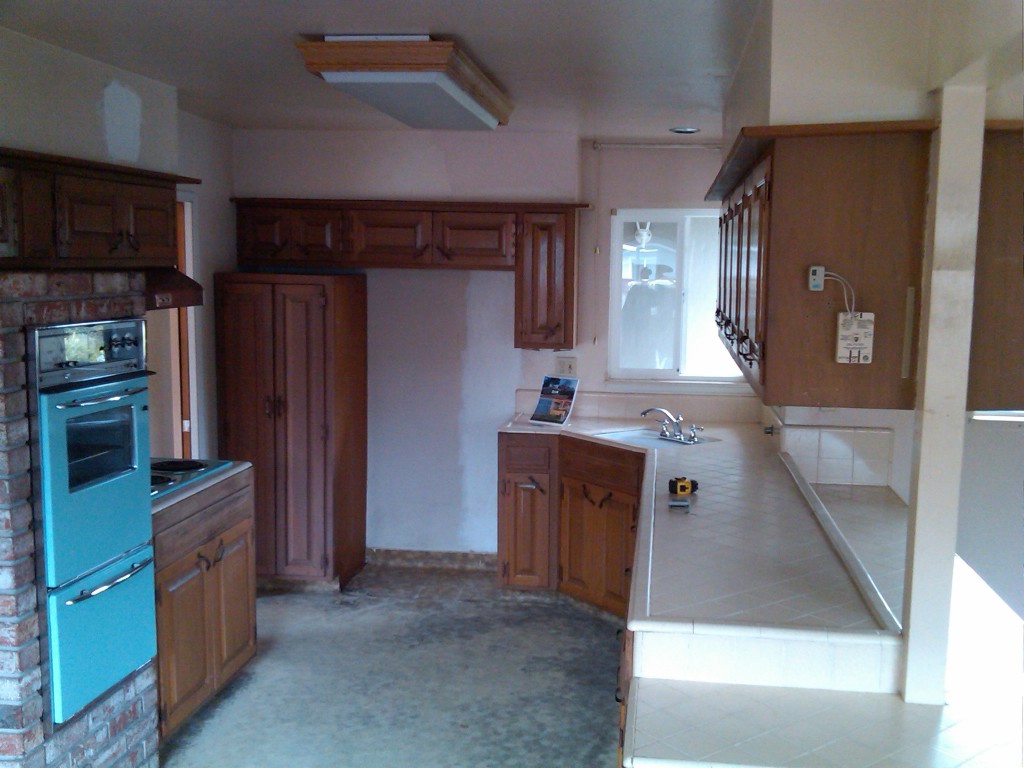
The previous owner of this home had lived there for many years and never remodeled any part of the home. In fact, it still had it's original wall oven and matching cooktop which were in surprisingly good shape. Just take a look--these photos are very telling of the last time this home got a good update!


Not only did we take the oven and cooktop out, we took the whole wall with them. This allowed for a much more open kitchen atmosphere, creating more of a great room. The great room got higher ceilings as well. We took the 8 ft. ceiling up to almost 13 ft. by vaulting them. Even without adding actual square footage, we were able to give this home a lot more space.


Before After
The fireplace went from painted white brick to this Carlsbad Grey 12x24 stone tiles. It is much more modern and is very easy to coordinate with.


Before After
The Hall Bathroom went from drab and dark, to chic and bright. We brightened it up with a new suntube, pendant lights and some great new tile. We re-tiled the floor, tub and backspash.


Before After
In order to fix the mess that was the Master Bathroom, we had to move a couple of walls. See in the "before" picture here how there is a wall blocking the view to the shower? That wall is actually the closet for the Master Bedroom and it was in the exact wrong place for the room. We moved the closet and in turn, gained a larger shower! We were also able to create more space for the Master Bath, by eliminating the hallway linen closet. Take a look at the before and after photos, and then scroll down to see the floorplans to understand how the walls were moved.


Before After


Before After
Subscribe to:
Posts (Atom)